Pages

Monday, 27 July 2020

Voices in My Head Blog Hop (Ellen Hutson Summer of Stamping)


Good morning! It's time for the next Essentials by Ellen Summer of Stamping Release, and Julie has nailed it with 3 new sets in her Voices in My Head series! We're having a blog hop today (details below) so be sure to hop and comment for your chance to win!


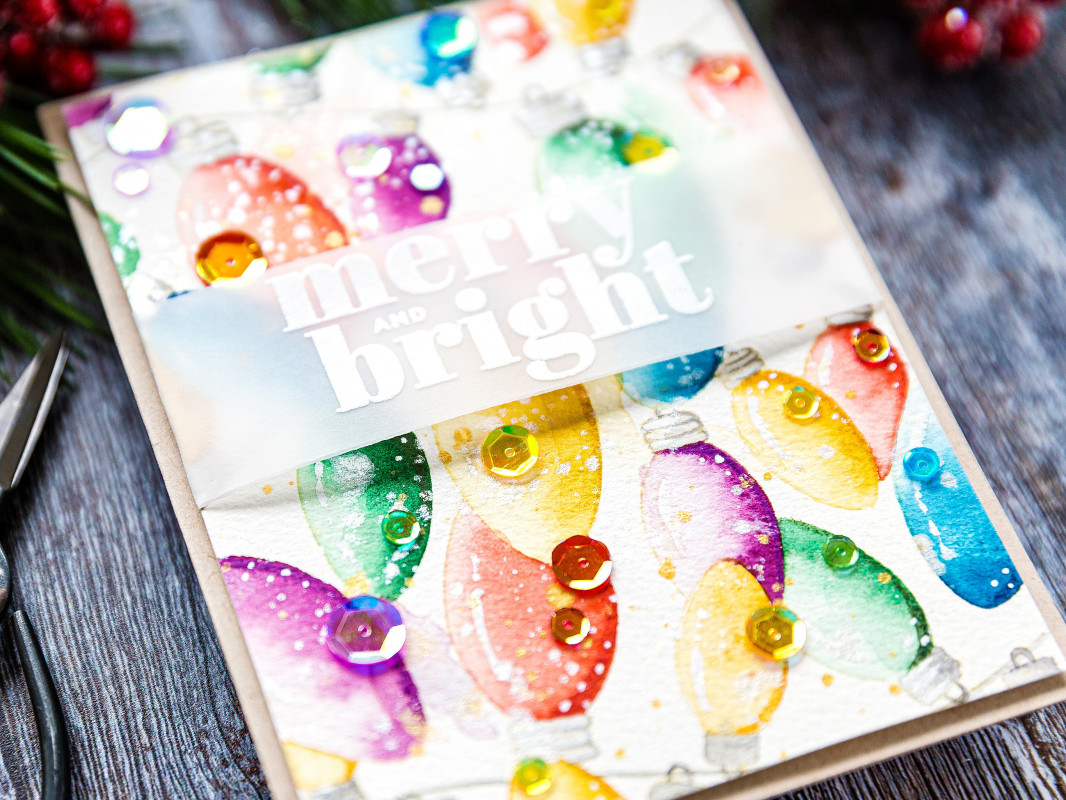
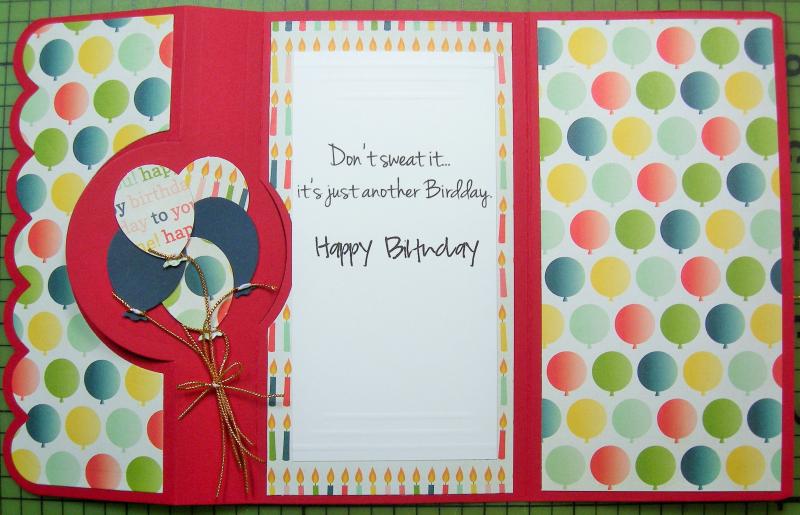
I was inspired by every cartoon we've ever seen that had a 'good' voice and a 'bad' voice speaking to someone, and these sets worked together with the original VIMH set perfectly to create what I had envisioned!

I kept the colour to a minimum - pale red for the 'bad' voice and blue for the 'good' voice, blended through a negative mask created by the speech bubble die from High Five, another EBE set that works well with these ladies.

I  used an older sentiment from Unicorns and Rainbows that I thought was appropriate!


Blog Hop Details:
We’ve got a super fun prize!!! One random & lucky commenter will win $25 to the EH shop!!! To enter for a chance to win, make sure to leave comments at each stop along the hop! And don’t forget to comment here too for a bonus entry! Comment before Saturday, August 1st at 11:59pm PDT. The winner will be notified by email.


Ardyth  <<You are here!

Sunday, 26 July 2020

Rescue Your Card (and Be Merry!)


Congratulations to this week's Featured Stamper, Debby (limedoodle).

I chose this card as my inspiration:


I focused on Debby's:
-Christmas light theme
-vellum band for sentiment

I changed:
-colours
-ink blending instead of watercoloring
-dark background
-size/shape of card


I started by cutting negative masks for my Christmas light bulbs and blending ink through them, adjusting pressure to create shadows and highlights. This helped to make my lights look dimensional and shiny.

I blended night-time colours between the lights for some extra drama and then tried to figure out how to make the light sockets look realistic, despite the fact that they were the same colour as the inks.

Here's a video showing how I used 3 simple strategies to rescue this card:


Wednesday, 22 July 2020

Easy 4-ingredient Backgrounds


Today, I'm sharing one background-making technique that uses only 4 crafty 'ingredients' but has limitless versaility! I started with 3 cards using a basic technique, and then came up with lots of tips for changing it up and made a couple more!


Here's my video:


Tuesday, 21 July 2020

Smile 3 Times


I had time on the weekend to play a bit more with the new Pink & Main Rose Garden layering stencils and their Ergonomic Blending Brushes and I made a few more cards.


For this one, I blended gray ink through the first two layers (I guess I should say the leaf layer and the tiny flower layer - there is no reason to call them 'first' lol!). I faded the ink off to white in a diagonal direction.

Then I laid the rose layer over top, and I masked off the flowers I didn't want ink through. I used the mini brush to put different colours of ink through each rose.

I finished with the big smile sentiment stamped with Versafine Onyx, and created a sentiment strip for the rest of the sentiment.


Same idea of fading the ink, but this time, I let it fade on a straight line, and I used only fuschia ink for the roses.


Finally, I used a rainbow of inks, moving the colours so that the leaves and flowers would be different.

Monday, 20 July 2020

Summer of Stamping: Camp Wanna Stamp


It's Week 3 of Ellen Hutson's Summer of Stamping and today's set is from Avery Elle, available exclusively in the Ellen Hutson shop! It's called Camp Wanna Stamp - that's my kind of camp!


I'm not in today's hop, but be sure to start at Ellen's blog and hop and comment for a chance to win!

I stamped and coloured the 4 critters in the set with Copic markers. Then I masked them and blended ink around each one.

My sentiment is from Avery Elle's Banner Bits, snipped apart to allow for the fishing rod.

I added some of the 'extra' images from the set, including their little paws.  I also used a black pen to add some eyes - I think this gives them even more personality, don't you?


Edgeless Shaker Card


I'm on the Birch Press Design blog today with a photo tutorial showing how I made this edgeless shaker card.


And of course, I had to make another card from the leftover ink on the stencil:


 I used double sided tape to adhere Lawn Fawn Pearlescent vellum to white cardstock and then stacked it up with 3 more hello die cuts for some shimmer.


Sunday, 19 July 2020

Thank You


Congratulations to this week's Featured Stamper, Debra (derck).

I chose this card as my inspiration:


I focused on Debra's:
-diamond background pattern
-circular die cut sentiment

I changed:
-colours
-no ribbon
-rectangle to square

I started by cutting 6 rowse of diamonds from Pretty Pink Posh's Stacked Edges 2. I blended ink onto each diamond, darker at the top, fading toward the bottom. I changed colours to create a loose rainbow pattern.

I spritzed the diamond 'stripes' with Avery Elle Shimmer Spray. When they were dry, I glued them to a white panel, flat at the top of each diamond, and raised with foam tape at the bottom.

I stamped my sentiment from Thoughtful Greetings on a white circle die cut and popped it up on the diamond pattern.

Then I splattered metallic gold watercolor over for some extra shine.


Saturday, 18 July 2020

Smile


Today, I'm lucky enough to be able to share a sneak peek at some new Pink & Main products that will be available on Monday!

I created this card with the cornder of the new Rose Garden Layering stencil set - I started with the leaves layer and placed the stencil onto the panel before blending green ink through it and over the rest of the panel too.

I used the Pink & Main Ergonomic Blender Brush - it's big and so easy to use to get smooth coverage on large areas quickly!

I added some blue ink just at the bottom, and that gives this card a layered look.

Then I used the positioning notches cut right into all 3 of the stencils to align everything perfectly - such a clever idea! I used the Mini Ergonomic Blender Brush (available Monday) to blend purple and then pink ink through the top two layers.

When I had all 3 layers done, I added some detail with a yellow Copic marker for the roses and a white gel pen for the tiny purple flowers.

I heat embossed a sentiment from the Smile set, using WOW! Embossing ink and Opaque Bright White Embossing Powder.


Friday, 17 July 2020

Thank You (Summer of Stamping)


One more with the Ellen Hutson Summer of Stamping set You Should Know. This time no colouring, just some ink blending on the sentiment strip. Quick, easy but still full of impact!


Thursday, 16 July 2020

Using Alphabet Dies


I'm on the A Jillian Vance Design blog today with a video showing tips and tricks for working with alphabet dies, along with lots of fun ways to use them!


Wednesday, 15 July 2020

On My Mind (Summer of Stamping)


Today's Summer of Stamping card has a completely different look and feel. This time, I stamped the image twice on my panel, and I used Copic markers and no line colouring.

For a fun touch, I added some Nuvo Crystal drops to the flower centres and then sprinkled them with Studio Katia chunky glitter.


Tuesday, 14 July 2020

Thank You (Summer of Stamping)


Today I'm sharing another card from the Essentials by Ellen Summer of Stamping release for this week.

This time, I stamped it off the 4 corners of a panel of white cardstock. I used Copic markers and coloured all the leaves the same shade of green, and then I used multiple shades for the rest of my rainbow of flowers.

There was a 'bald patch' in the middle of my panel, so I used an Essential Oval and cut it out. I performed some stamp surgery on the Thank You For Being a Friend sentiment and stamped it with Versafine Onyx directly onto my cardbase.

Then I popped up the floral panel for a bit of 'reverse' dimension. And that's it for this simple, but happy, rainbow card!


Monday, 13 July 2020

Using Tags to Make Cards


Good morning, campers! It's week two of Ellen Hutson's Summer of Stamping and we have another release!


Today, we have 3 new Essentials by Ellen sets - You Should Know, Thanks for Being a Friend and Mondo Pansy. I'm not in the hop, but here's the link to Ellen's blog, where you can start and hop along for a chance to win!


I started by stamping the floral image from You Should Know onto Arches Hot Press watercolour cardstock. I watercoloured it with my Zig Art & Graphic Twin Tip markers, adding lots of layers of colour for depth and interest.

Then, I watched a video from Justine and was completely inspired to turn this panel into tags and get 4 cards from 1!

I admit I was very nervous about cutting into all that work, so I did a test run with a piece of scrap paper that I had stamped with the image, just to be sure that all 4 tags would get 'enough' flowers on them. I was not happy about 'losing' the diamond bit in the centre, but I think I'll survive!

Also, my watercolour cardstock panel was a 1/4 inch shorter than required for that 4 in 1 Shipping Tags die, but that worked out well - I just backed each one onto a full-sized black tag and that gave me stability plus a little border at the bottom! Almost like I planned it!

To finish the cards, I stamped the flowers off 2 corners of my white square panels, using second generation Twilight ink, and backed them onto black cardbases.


Saturday, 11 July 2020

Super Duper Birthday


Congratulations to this week's Featured Stamper, Karen (karensallen).

I chose this card as my inspiration:


I focused on Karen's:
-dots
-metallic accent
-scalloped edge (look way left!)
-birthday theme
-round focal element coming from right

I changed:
-fewer dots
-rainbow colours
-black instead of red
-silver instead of gold
-no fun fold

I was initially drawn to the 'rounded' balloons on Karen's patterned paper, as well as the scalloped edge. I started by using the negative edge of a Pretty Pink Posh die to scalloped die on the edge of a panel of white cardstock.

Then I used a small Essentials by Ellen Essentials Circle die to cut out a circle from each scallop. I blended a rainbow of Catherine Pooler inks on them . I cut the circles again from silver sparkle cardstock and used the frame portion, and popped up the colourful circle in the middle of each.

My sentiment is in an Essential Oval, also with a silver frame, and is meant to represent the balloon circle portion of Karen's card, which would move when you fold her card together. Mine doesn't move.

Finally, I put my panel on a black card base, leaving a narrower strip of black visible on one side than the other. This mimics the red around the middle panel of Karen's card.


Thursday, 9 July 2020

Light-Up Christmas Cards


I'm on the Birch Press Design blog today showing how I added lights to some Christmas cards I made with various layering dies!


Affiliate Links:

Wednesday, 8 July 2020

Monday, 6 July 2020

S'more Shaped Card (Essentials by Ellen Summer of Stamping Release!)


Good morning and welcome to Ellen's Summer of Stamping!


Today is release day for our exclusive Lawn Fawn set, The S'More the Merrier, and we're having a blog hop to celebrate (details below).

I decided to make a fake shaped card. 

I started by creating my s'more. I cut strips of Kraft cardstock for my graham crackers. I stamped them with one of the Pattern Play stamps for a little texture.

Then I used the Landscape dies and more Kraft cardstock, to cut my melty chocolate. I inked it with Icing on the Cake ink to get my chocolate colour.

Finally, I cut a rectangle for my marshmallow, and I rounded the corners with an old punch. I blended Sand Castle and Shea Butter ink on the edges to give it some toasty colour and dimension.

When I put it on a 4.25 square card, you could still see the card base where the marshmallow corners were rounded, and I didn't really like that look. So I just cut the cardbase to 4 inches wide (I left the height at 4.25). 

Here's a view from the back so you can see what I mean:


Blog Hop Details: 

We’ve got a super fun prize!!! One random & lucky commenter will win $25 to the EH shop!!! To enter for a chance to win, make sure to leave comments at each stop along the hop! And don’t forget to comment here too for a bonus entry! Comment before Saturday, July 11th at 11:59pm PDT. The winner will be notified by email.


Ardyth Percy-Robb  <<You are here