I found a faster way to ink blend perfectly smooth panels - only one of these panels was ink blended - the other two were 'gel-blended' - can you tell which is which?

I found a faster way to ink blend perfectly smooth panels - only one of these panels was ink blended - the other two were 'gel-blended' - can you tell which is which?


I chose this card as my inspiration from the gallery of this week's Splitcoaststampers' Featured Stamper!


Welcome to this week's LIMES inspiration post!
I chose this card as my inspiration from the gallery of this week's Splitcoaststampers' Featured Stamper!


In order to create all the multi-coloured diamonds I needed for this card, I ended up with some rainbow leftovers. I made two same-but-different cards with these, by popping up the rainbow die cuts and then adding a layer of white panels cut with another cover plate die.
I finished with die cut sentiments, and then put gems in each of the little 'holes'. This is a great way to use up those larger gems that might tear an envelope in the mail - this way they are directly on the card base, and protected by the popped up layers.
Which one do you like better?

Welcome to this week's LIMES inspiration post!
I chose this card as my inspiration from the gallery of this week's Splitcoaststampers' Featured Stamper!

I am always amazed at what happens when you blend primary colours and this card with its blended diamonds really caught my eye!
I created striped panels with my gel press and some shimmer plates, then cut them with the Catherine Pooler Cross your X's cover plate. I used the negative pieces to create the centre panel on this card, and made sure to mix up the colours for added interest.
I finished with a stacked up die cut from Avery Elle, and added small hearts cut from Inca gold cardstock, and some gems.


Today I'm sharing 9 quick and easy ideas for using up those backgrounds you have on hand. And if you're a person who doesn't make backgrounds, these ideas work with patterned paper, too!


Today I'm sharing how I get perfectly layered prints, using lots of my new stencils, to create artistic, mixed-media cards! And if you don't have a gel plate, I've got you covered with an ink-blended alternative!
(DISCOUNT CODE: Use ARDYTH10 for 10% off at A Colorful Life Designs)! When you're finished watching my video, Amy has a video showing how she's using some of her new goodies to make a birthday card for her husband! This is our second collaboration and I'm hoping it will become an annual tradition!

Welcome to this week's LIMES inspiration post!
I chose this card as my inspiration from the gallery of this week's Splitcoaststampers' Featured Stamper!

LIST: Colours (white, silver), Techniques (heat embossing, dry embossing), Elements (embossed background, LOVE theme, 4 letters in a grid, monochrome, square focal/sentiment, silver frames)
INCLUDE: heat embossing, dry embossing, 4 letter grid
MODIFY: used metallic rainbow colours, die cutting instead of stamp/embossing for grid (got 2 cards with the die cuts!), put heat embossing on the background and dry embossing on the grid
EXCLUDE:
SPIN: square card

Welcome to this week's LIMES inspiration post!
I chose this card as my inspiration from the gallery of this week's Splitcoaststampers' Featured Stamper, Renata!


Today, I'm sharing a video talking about facing our crafty fears. I faced one of mine, and look how much fun I had!
If you have crafty fears, try these:
I took ink-smooshing to the next level by using watercolor powders and Distress Oxide sprays - so easy to make and so hard to stop making!
Here's my video:
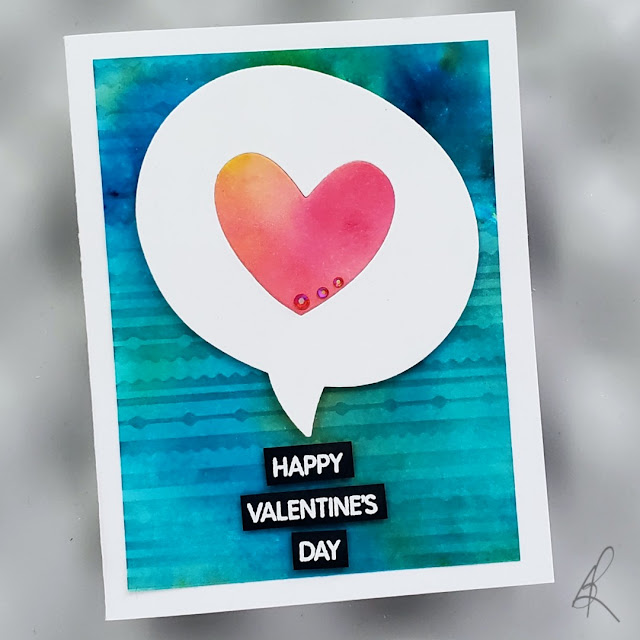
Happy Valentine's Day! This is a very simple card I made with a new background technique using my gel plate and watercolor powders (video coming later this week!).
When the background was dry, I used the Festive Stripes stencil and some Daydream ink to add some subtle texture to it.
I inlaid my heart (made with the same technique) into the speech bubble and added 3 little Rose Garden gems for some sparkle. Then I embossed my sentiment onto black cardstock for a pop of contrast.
If you love learning new techniques, check out the Card Maker Success Summit. It's free to attend, includes 25 speakers (including me!) and it starts on Thursday!

It's graduation season and this is a card I made for my friend's daughter. She didn't want her 'ugly' school colours, just her favourite blues.
I created this background with my gel plate, some Catherine Pooler inks and a Hero Arts stencil. I can't remember exactly how I did it, so this one is truly unique! Check out the 3D 'texture' on this flat background!
I finished it with a square negative frame and a heat embossed Altenew sentiment.

Don't worry, you're not seeing double! Yes, these cards are very similar to last week's, but this time, I made my own coloured cardstock!
Check out this video for 6 quick techniques I used to customize my white cardstock!

Masculine cards are hard, aren't they? I like to focus on rich colour and simple shapes when I make masculine cards - using a gel plate to create a textured background is a great way to keep a simple card interesting!
I created my panel with Catherine Pooler inks and a 2 inch brayer that makes it easy to leave a choppy-looking texture.
I splattered the panel with metallic gold watercolor and then trimmed the panel to a 4 inch square.
I cut a circle from the centre with an Essential Circle die (which also cuts a frame, which I left out).
I popped up the circle and square portions of the panel on a white cardbase that I had blended Juniper Mist ink onto.