Here’s some tips for using multiple images and colours to make stamping with the tool faster!
1. put flower stamp on tool door, stamp, turn, stamp2. put flower center stamp on flower image, pick up with door3. ink both stamps with different colours, turn and do two images like this4. add leaf to first flower, pick up with door5. ink all stamps with different colours, turn and do 5 images like this6. remove flower stamp, do 2 turns with flower centre and leaf7. remove flower centre stamp, do 2 turns with leaf8. stamp sentiment9. finish card.
There's a new tool in town! You know I love to spin, and this addition to the Sizzix Stencil and Stamp tool is so fun! I'll have a full video next week showing more details but right now, here's what you need to know:
stamp positioner (think MISTI) and spinner (think Stamp Wheel) in ONE!
you need the Stencil and Stamp tool for the Stamp and Spin accessory to work.
similar 'door' design for stamp positioning to MISTI (not flip over like Stamp Wheel)
if you have a Stamp Wheel already, you don't need this tool to spin
8 'clickable' positions vs Stamp Wheel's 16
tool is larger than an original-sized MISTI - takes up more space, but allows for larger designs
I made this card with 2 stamps (well, 3 if you count the sentiment).
First, I've got 6 questions to ask ourselves when we're trying to optimize our crafty inventory levels. Whatever the 'perfect' level is for you - these questions can help!
Second, while I was chatting about all that, I made my own temporary layering stencils for simple shapes! I created a fun pattern with an Altenew tulip stamp. I stamped it again on 3 post it notes, and then used them to create temporary stencils for ink blending!
Recently I completely re-organized my stamps, dies, stencils and embossing folders, both physically and electronically, and while I was doing that, I came across some old items that I've been holding onto but not using. I decided to challenge myself to use a few of them, in a new way to decide whether it was time for them to go to a new home.
If you want to know more about my reorganization as well as why (and how!) I changed from Evernote to Air Table, join us at the FREE Paper Crafters Get Organized Summit next weekend!
I chose this card as my inspiration from the gallery of this week's Splitcoaststampers' Featured Stamper!
LIST: Colours (orange, pink blue, beige), Techniques (copic colouring), Elements (big 'flower burst' in background, ballerina)
INCLUDE: orange, pink, blue, big flower burst
MODIFY: stenciled instead of coloured, added die cut sentiment and sparkle
EXCLUDE: Ballerina
I loved the drama on the inspiration card - the energy from the background really caught my eye. I stencilled some pink and yellow/orange ink through a dahlia stencil, blended blue ink around the edges and then added some gold watercolor splatter.
Instead of a ballerina, I die cut a sentiment from white cardstock and added some gems for sparkle
MODIFY: layered stamping for the 2 flourishes, put them in opposite corners instead of all along the left side, embossed the panels instead of butterflies with dots, mixed the colours, die cut sentiment, white card base, not dark
EXCLUDE: butterfly
The repetition of the 3 panels on my inspiration was a really cool idea, with lots of geometric possibility. I chose a layering stamp (a peacock tail, actually) as my flourishes, and included all 3 of my colours in those. I cut them down quite a bit to allow for lots of white space. Before putting my white panels onto my white card base, I embossed them with my current favourite - Dotty Circles from Altenew.
I chose this card as my inspiration from the gallery of this week's Splitcoaststampers' Featured Stamper!
LIST: Colours (red, white, pink, silver), Techniques (embossing, die cutting), Elements (grid of hearts, oval sentiment panel, heat embossed stamped sentiment)
INCLUDE: red, white, grid of small shapes, , die cutting,
MODIFY: colours, stenciled instead of die cut, small cirlce and die cut for sentient
EXCLUDE: hearts, oval, heat embossing, scallops
You all know I love a grid layout, and I've had this idea ever since I got this half-circle stencil. I wanted to blend it then turn the stencil to create these 3/4 pie shapes. But the circles didn't match up when I turned the stencil. I was not going to be defeated by that! lol! I masked off one of the half-circle shapes and blended darker green ink through individaully.
Then I used a similar technique to mask around a circle on another stencil and I added some red berries
I have a couple of sentiment stamp sets that have these little 'type-written' greetings that fit perfectly in small circle die cuts. I added a red frame and added it to a die-cut Christmas word
I chose this card as my inspiration from the gallery of this week's Splitcoaststampers' Featured Stamper!
LIST: Colours (persimmon, yellow, blue, gold. white), Techniques (die cutting) Elements (nativity scene with circle around, pine trees, script die cut sentiment, shooting star, interesting background)
INCLUDE: persimmon, yellow, blue, white, nativity scene with circle, interesting (if I do say so myself!) background
MODIFY: stencil technique, added Joseph, embossed and inkblended frame, stamped sentiment, my star is not 'shooting'
EXCLUDE: pine trees
SPIN: square card
The non-traditional, but rich colours of this Christmas card really caught my eye. And the name of the colour - persimmon - it just sounds nice, doesn't it? lol!
I used a new layering stencil set from Concord &9 and then layered on some radiating glow by using some masking stencils and added a sentiment from Waffle Flower. I used a smaller circle stencil to create a glow around Baby Jesus. I spritzed the panel with shimmer spray - this adds shimmer and a velvety finish to the cardstock.
For my persimmon frame, I inkblended yellow, orange and red onto it, then embossed it with an embossing folder and spritzed shimmer spray and then splattered some gold watercolour on it.
I chose this card as my inspiration from the gallery of this week's Splitcoaststampers' Featured Stamper!
LIST: Colours (brown, rust, cream), Techniques (electronic die cut), Elements (cubes built from die cut diamonds, vertical cream area with woven ribbon stripe, raised round embellishments (brads?), patterned paper on one side of the cubes
INCLUDE: brown rust, cubes, clear area
MODIFY: added blue and yellow, stencil instead of cut, portrait instead of landscape, wider 'free space' beyond the pattern, splatter instead of patterned paper, sentiment instead of ribbon, stamping instead of brads
EXCLUDE: ribbon, brads
I love geometrics and lately I'm fascinated with fall colours of teal and orange. I masked off the top portion of a cube-builder stencil to leave some white space, and then I masked each diamond down the centre, to blend two colours on each one, taking my cubes into this really fun, dimensional triangle/star-type thing, so it's quite a different look.
I splattered gold watercolour to mimic the patterned paper on my inspiration, and stamped little dots in each corner of the pattern.
This is part 2 of my video sharing some ideas for using solid stamps in card making. These basic card making tools can be used in so many ways to make amazing cards!
At the Card Maker Success Summit a couple of weeks ago, we met a whole lot of new card makers, so I'm thinking this is a great time to show how you can use basic cardmaking tools and skills to make cards that are anything but basic.
So I started to make a video sharing some ideas for using solid stamps in card making but it turned out to be over 16 minutes long, so I've split it into two more manageable videos and I'll share the next one next week.
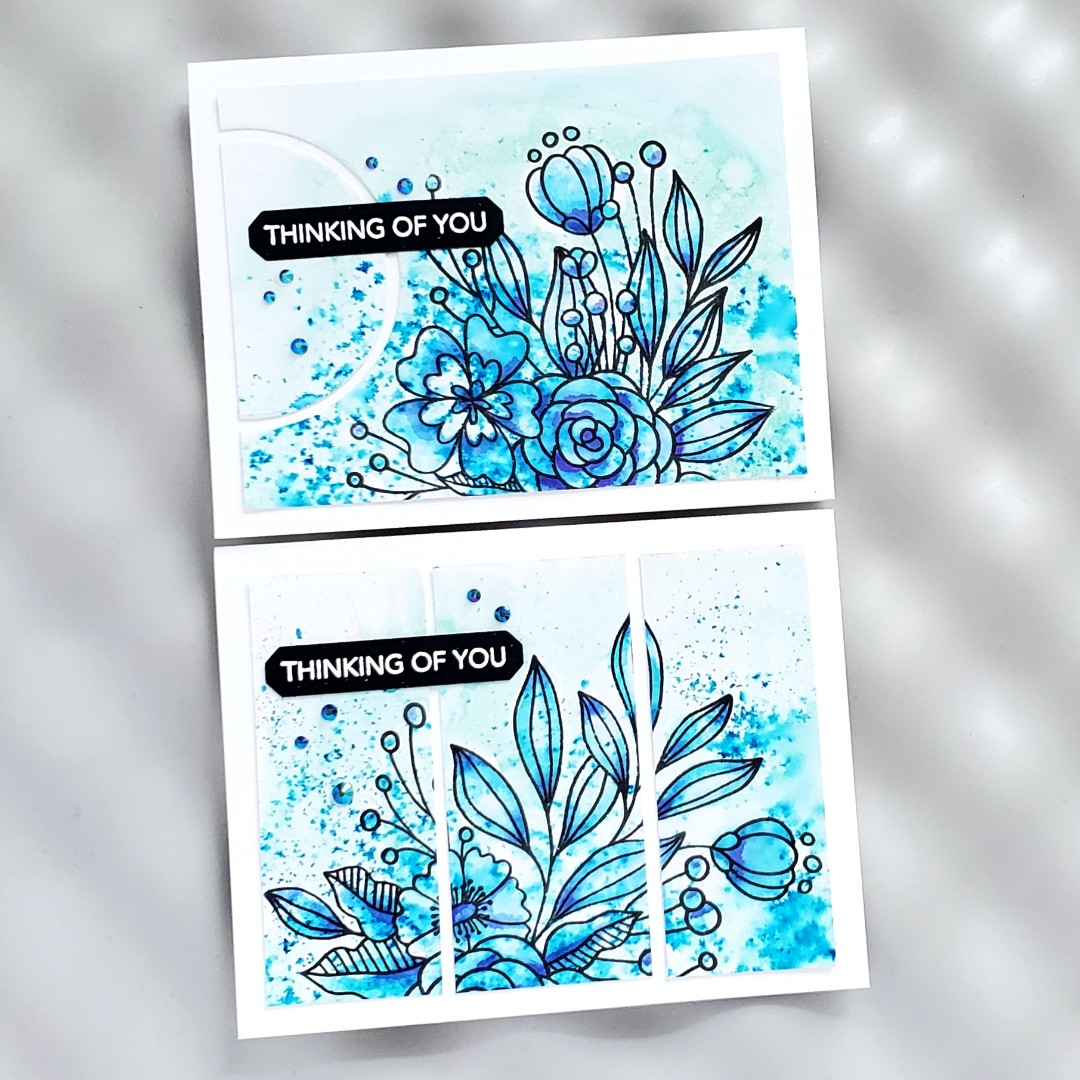
LIST: Colours (green, black, white), Techniques (die cutting, stamping), Elements (botanicals with black outlines, 3 panels, semi circle sentiment strip, gems)
INCLUDE: Monochrome colour scheme, botanicals with black outlines, 3 panels, semi circle element, gems
MODIFY: green to blue, stamping and watercolouring instead of die cuts, 2 cards, orientation of cards,
EXCLUDE: Die cut leaves
SPIN: 2 for 1 design
I started by stamping my floral image on a piece of watercolour cardstock and then coluring it in with Karin markers (any watercolours you have will do, I just wanted to practice with these). I used 3 blues and a deep indigo to add colour.
Then I spritzed the whole panel with water, and sprinkled some blue watercolour powder over top to create my background.
I cut the panel in half and then cut out a half circle frame from one, and trimmed the other into 3 panels. I finished with a Taylored Expressions sentiment and some Crafty Meraki gems.
LIST: Colours (Red, white, green, blue, yellow), Techniques (colouring, stamping), Elements (red car, balloons, presents, patterned paper background, horizontal element, red frames, red ribbon, 'fireworks' sequins)
INCLUDE: red car, horizontal element on background,
MODIFY: die cut instead of stamped/coloured, embossed background instead of patterned paper,
EXCLUDE: ribbon
SPIN: Square card
I started by creating my background by piecing together 2 strips of Sizzix metallic gray cardstock with 1 strip of white, then embossing it with a new folder.
I cut the car from red mirror cardstock, and holographic cardstock and assembled it.
I stamped an old sentiment with WOW! Embossing ink onto a strip of the metallic gray cardstock and embossed it with silver powder for a tone on tone look.
Here's another grouping of 3 companies, working together to make an awesome (if I do say so myself! lol!) card.
Yesterday, I combined the coverplate with this sentiment die and some circle dies. Today, I used an embossing folder to add texture before I inlaid the triangles back into the white frame.
I doubled up the white sentiment with a black layer to improve legibility and added some sparkle with some of the new Crafty Meraki gems!
I purchased the Golden Days layering stencil from Altenew and it arrived late last week. I was still in my 'cards for all seasons' mindset so I grabbed my Catherine Pooler inks and chose colour combinations to make this big fluffy flower work all year long (see ink colours below)!
This stencil set is easy to line up and use to create the amazing details you can see. I cut them all with a very large circle die and then used the same inks to create backgrounds (except for Spring, I thought a fresh green would make it feel more springlike).
Then I made 2 more cards, with colour schemes that will work at any time of year.
If you missed my video about stretching your dies to work all year long, here's a link: