Pages

Showing posts with label Church Christmas. Show all posts

Friday, 19 January 2024

Distress Oxides + Photo Paper = AMAZING BACKGROUNDS!


Usually, I am a one-ink girl, and my inks of choice are Catherine Pooler's dye inks. The vibrant colours, the full first-time coverage when stamping,  the ease of blending, and the water-reactiveness all make these inks my favourites.

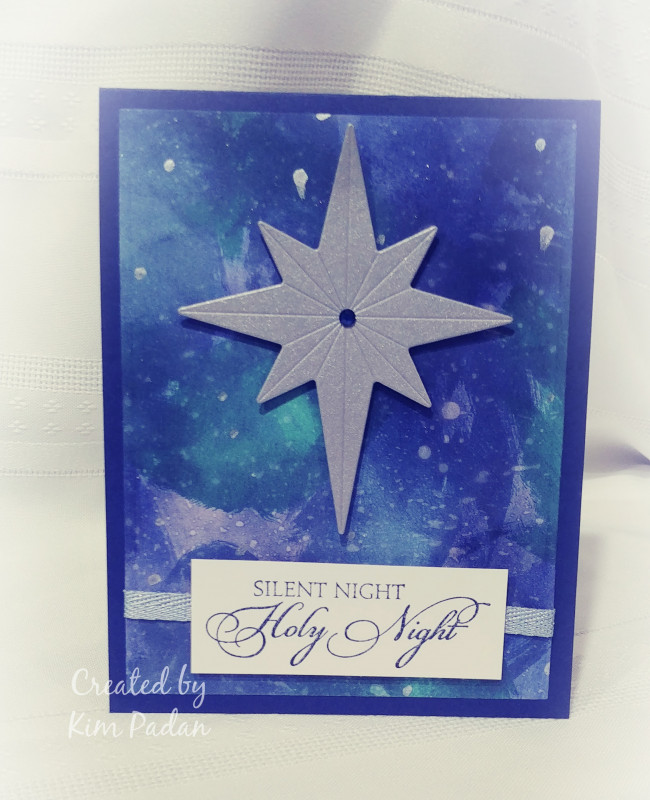
But recently, my friend Sasha Reade showed a technique using Distress Oxide inks with photo paper, and I knew I just had to give it a try.

And since practice makes perfect, I figured I would try it 15 times, and use a 2 for 1 design to make 30 cards for my Church Christmas project. This is a great way to really try out the technique, and figure out what works best and what doesn't. 

And running out of the most important colour, really didn't work well at all. Watch here to see my rescue strategy.


Saturday, 30 December 2023

Nativity Sky

 Welcome to this week's LIMES inspiration post!

I chose this card as my inspiration from the gallery of this week's Splitcoaststampers' Featured Stamper!

LIST: Colours (blue, white, black), Techniques (masking, stamping), Elements (blue strip, stamped sentiment, fun sky technique, silhouette trees on snow, , silver stars, scoring)

INCLUDE: blue, white, black, masking, stamping, stamped sentiment, fun sky technique, scoring

MODIFY: layout, silhouette Nativity, 


I thought I would give myself a Christmas gift for next year, by getting a head start on my Church Christmas cards while ideas are still fresh in my mind. I made 20 of these by using some simple masking and inkblending to create the radiance in the sky.

There are 3 scored lines under the sentiment, which seem to have 'disappeared' in the photography, but in real life, it is a nice way to add a little interest without distracting from the focal point.


Saturday, 11 November 2023

The Lord Is Come


Welcome to this week's LIMES inspiration post!

I chose this card as my inspiration from the gallery of this week's Splitcoaststampers' Featured Stamper!

LIST: Colours (persimmon, yellow, blue, gold. white), Techniques (die cutting) Elements (nativity scene with circle around, pine trees, script die cut sentiment, shooting star, interesting background)

INCLUDE: persimmon, yellow, blue, white, nativity scene with circle, interesting (if I do say so myself!) background

MODIFY: stencil technique, added Joseph, embossed and inkblended frame, stamped sentiment, my star is not 'shooting'

EXCLUDE: pine trees

SPIN: square card


The non-traditional, but rich colours of this Christmas card really caught my eye. And the name of the colour - persimmon - it just sounds nice, doesn't it? lol!

I used a new layering stencil set from Concord &9 and then layered on some radiating glow by using some masking stencils and added a sentiment from Waffle Flower.  I used a smaller circle stencil to create a glow around Baby Jesus.  I spritzed the panel with shimmer spray - this adds shimmer and a velvety finish to the cardstock.

For my persimmon frame, I inkblended yellow, orange and red onto it, then embossed it with an embossing folder and spritzed shimmer spray and then splattered some gold watercolour on it.


Friday, 13 January 2023

Glory in the Highest: Tips NOT for Making Multiples


Even if you never make multiples, even if you are not ready to make Christmas cards, you should definitely watch today's video. Why?
  • tips for simplifying elaborate inspiration 
  • tips for die cutting with no warped or damaged plates 
  • tips for intricate die cuts that you probably already know, but if you're like me, you forget until it's too late
  • tips for maximizing your productivity. 
These tips will work at any time of year, and since today I am making multiples and I am making Christmas cards, I'll also be sharing tips for that. 


Saturday, 24 December 2022

LIMES: Glory to the Newborn King


Welcome to this week's LIMES inspiration post!

I chose this card as my inspiration from the gallery of this week's Splitcoaststampers' Featured Stamper!


LIST: Colours (white, yellow, red, gray). Techniques (stamping, masking) Elements (coloured angel with yellow 'glory', stamped sentiment, red frame)

INCLUDE: white, yellow, stamping, masking, angel with yellow 'glory', stamped sentiment

MODIFY: angel on the left, sentiment on the right, blue instead of gray, masked/blended 'frame

EXCLUDE: red

SPIN:

Merry Christmas! I was inspired by this glorious angel card,  but made mine a little more clean and simple, and left the angel uncoloured. 

When masking her to blend her 'glory', I realized that there are no rules that say that a mask has to be in one piece! I cut her halo separately from her body and that made it so much easier!

I laid a rectangle stencil over top and blended blue inks to create the sky, to give some definition to the card, and I love how even though it's not filled in completely, your brain can "see" the full rectangle.

I made multiples of this card as part of my Church Christmas project this year.

These stamps are both retired, (Stampendous Angel, Neat & Tangled sentiment) but I've linked similar ideas below.


Sunday, 24 July 2022

Heaven & Nature


Congratulations to this week's Featured Stamper, Cheryl!

I chose this card as my inspiration:


LIST: Colours (grey, gold, white, pink), Techniques (die cuts, stamping), Elements (stars, sentiment strip, patterned paper)

INCLUDE: star focal point on dark background

MODIFY: Technique (I masked my star, ink blended the background), changed occasion from New Years to Christmas, sentiment strip closer to bottom

EXCLUDE: pink and gold, patterned paper

I used a star mask in the centre of my galaxy sky, before blending bright inks around the centre of the star and then working my through darker inks as I moved out toward the edges. I spritzed the sky with water, white ink spray and clear shimmer spray to create texture and stars.

Sunday, 7 November 2021

Joyful Tidings


Congratulations to this week's Featured Stamper, Ema. I chose this card as my inspiration:

LIST: Colours (silver, cream, white), Technique (colouring), Elements (tilted panel, snow queen, horizontal ribbon 'stripes', bow, tone on tone background, jewels and pearls

INCLUDE: Colours (silver, white), tone on tone background, jewels and pearls

MODIFY: snow queen into Angel, technique to heat embossing, horizontal elements are paper instead of ribbon

EXCLUDE: ribbon, bow

SPIN: added a sentiment

I created my background with some matte silver cardstock and Silver Pearl embossing Powder from WOW!, along with Catherine Pooler's Flourishes background stamp.

I stamped and embossed the angel and the sentiment and then used the same matte silver cardstock as a mat for my sentiment strip. I popped up the angel and added the embellishments with liquid glue.


Sunday, 24 October 2021

Oh Holy (Rainbow) Night

Congratulations to this week's Featured Stamper, cheermom.

I chose this card as my inspiration:

LIST: Colours (rainbow, white), Techniques: (stamping, colouring), Elements (lots of white space, night sky, row of multi coloured houses, black silhouette in sky)

INCLUDE: rainbow colours, white space, night sky, houses

MODIFY: colouring to ink blending, add dark sky, change santa to Bethlehem star

EXCLUDE: images in foreground

I made 32 of these cards in about 3 hours using an assembly-line type process. I cut all the card bases, then the panels, then I stamped the Bethlehem stamp with copic-friendly ink using my MISTI. I left the stamp on the MISTI door.

Then I did all the ink blending, one colour at a time on all 32 panels. I created a mask from acetate so my rainbow inks wouldn't go beneath that curve.

To finish it off, I added the star and sentiment to the MISTI door and re-stamped all 32 panels with Versafine Onyx ink, to give it a deep crisp outline.

Friday, 30 July 2021

Christmas in July - Mass Production


Let's talk about how to take an elaborate card design (including ink-blending, specialty cardstock and inlaid die cutting) and adapt it for mass-production.

I've fallen behind on my Church Christmas Card project for this year, so today's video shows how I started with this card design:


and simplified it to make 32 cards to add to my 2021 Church Christmas stash!


Sunday, 20 December 2020

Christmas Star


 Congratulations to this week's Featured Stamper, France Martin.

I chose this card as my inspiration:


LIST: solid coloured background with stars, big star focal point, sentiment banner, white cardbase

INCLUDE: dark background, star

MODIFY: technique, colour, star shape

EXCLUDE: Sentiment

SPIN: Sparkle


This card has a long story behind it. It (and many others!) was made to be donated to a retirement home in my locked-down city, to people who won't be able to go out to family or have family visit them over the holidays.

I started with some old Stampin' Up Pacific Point cardstock and I blended Suede Shoes ink on the top and bottom. Then I spritzed it with some Brushed Pewter Distress stain.

I cut a Simon Says Stamp star from silver glitter cardstock and glued it in the centre of this very simple card.

I made some other designs as well:


Here's a video with the story of this last-minute Christmas cheer project:


Saturday, 12 December 2020

Light Up Nativity Card


Congratulations to this week's Featured Stamper, Kath (kathinwesthill).

I chose this card as my inspiration:


LIST: Christmas card, stable/manger scene with animals, starry sky, trees, dark sentiment banner with white sentiment

INCLUDE: starry night, manger, 

MODIFY: Mary & Joseph instead of animals, die cut 

EXCLUDE: trees, sentiment

SPIN: light-up feature


This card was the perfect inspiration for a special nativity card I made for my mom, who collects Nativity sets. 

I started with the starry night - blending ink, splattering gold watercolour and spritzing with Avery Elle Clear Shimmer spray.

I cut the Paper Rose die cut from C9 chrome cardstock, and out of the blue panel.

I backed the blue panel with Pearlescent Vellum from Lawn Fawn and then glued the die cut outline into place.

Then I added the EZ Lights to the back of the blue panel, being careful to not let the wires show through the vellum.

There's a quick video on my Instagram feed showing how I made this. And here's a link to my previou YouTube video where I go into a lot more detail about using these lights:


Sunday, 26 April 2020

Church Christmas Cards April (Let Us Adore Him)


Congratulations to this week's Featured Stamper, Gloria (designzbygloria).

I chose this card as my inspiration:


I focused on Gloria's:
-red, green & white
-plaid
-holly
-white die cut focal point for sentiment

I changed:
-orientation
-no blue
-no stamped/coloured holly
-no red border die cut

This is the design for my April set of Church Christmas Cards. I ran out of time, and this card is very simple, so I did not make a video this month.


Here's how I made 32 of these in about 2 1/2 hours:

-used Memory MISTI to stamp 2 different plaid tone-on-tone backgrounds onto 2 red cardbases at once. This was a 'new to me' process but it worked well!

-used a higher contrasting ink and stamped plaid onto some green cardstock using the same technique as above.

-die cut all the shapes for each card at once. This includes 2 Pretty Pink Posh Holly leaves and berries, as well as the white panel using Pretty Pink Posh Decorative Tag 2 all in one pass. This meant I did 32 passes through my die cutting machine.

-I used some speckled 'natural' white paper that I have had for ages. Not too sure I'm loving the speckles....

-used an offcut from the label as a template, so that I could place the die cut into the hole, and use my MISTI to stamp the sentiment in the same place on the label

-glued the holly and berries on with liquid glue

-added Christmas Red Stickles for some sparkle.

I now have 127 cards complete for this year - only about 200 to go!


Saturday, 28 March 2020

Tips for Producing Multiple Cards - Christmas Blessings

click here for my 30 Days Colouring post.

Congratulations to this week's Featured Stamper, Betty (gabbygal).

I chose this card as my inspiration:


I focused on Betty's:
-red patterned background
-die cut red flower with green leaves
-swirl
-sentiment strips

I changed:
-season/occasion
-1 strips horizontal instead of 2 diagonal
-swirl as part of the background
-white accents instead of black

I made 30 of these cards for my Church Christmas Card project. Here's a video:


Friday, 22 November 2019

6 Ways to add Shimmer to a Card (Got Joy Creations Holiday Series 2019)


Good morning! Today, I’m taking over Dana’s blog and Youtube channel  to share in the fun of Dana’s Got Joy Creations Holiday Series for 2019. Make sure you are following this series for amazing holiday inspiration, giveaways, discount codes and don’t forget to leave a comment on her blog to qualify for all the giveaways!

The Got Joy Creations Holiday Card Series runs from November 17 to December 14. Each day, there will be a new holiday card idea to provide you with lots of inspiration for your holiday cards this year. Follow along on Dana's blog and  YouTube Channel and make sure you leave comments on the daily posts or videos for chances to win.

I'm also sharing the video on my channel:

Friday, 15 November 2019

Monday, 21 October 2019

AJVD / WOW! Blog Hop


Good morning! Today, the A Jillian Vance Design DT is hopping with the WOW! Design team! (hop details below).

For my first card, I started by blending Catherine Pooler Juniper Mist ink on a white panel, fading it out to white in the centre, to create a 'glow'.

When it was completely dry, I used WOW! Embossing ink to stamp the image from the Nativity Bookmark set and then I embossed it with WOW! Brass embossing powder.

To create a bit of a frame, I lightly inked the edges of the panel with the embossing ink and then used the same Brass powder.


For my second card, I found a piece of red vellum in my stash. I stamped the large Merry Christmas from Elegant Christmas on it and then embossed it with Metallic Platinum Sparkle powder. 

On a white cardbase, I stamped the poinsettias from the set with Catherine Pooler Twilight ink. Then I adhered the red vellum panel with liquid glue, which I placed just behind the letters of the embossed sentiment.


BLOG HOP DETAILS:

Please comment on each post (including WOW! Embossing Powder & A Jillian Vance Design blog posts) to be eligible to win 2 x $25, Gift Card to A Jillian Vance Design or WOW Stores. The winner will be announced on Monday, October 28th.