Monday 30 April 2018

Getting More from Stamps - StampNation Video


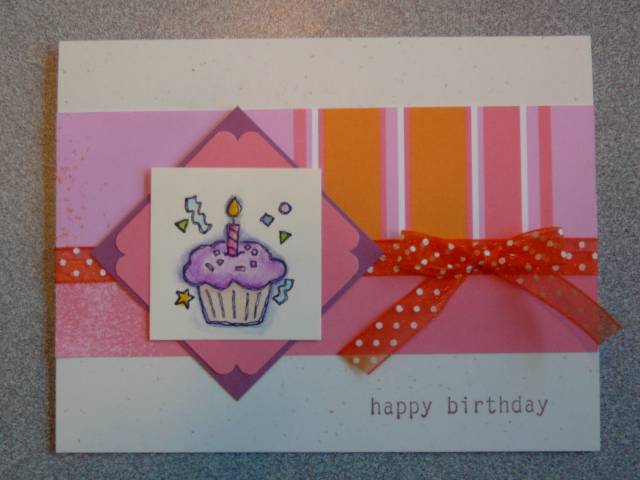
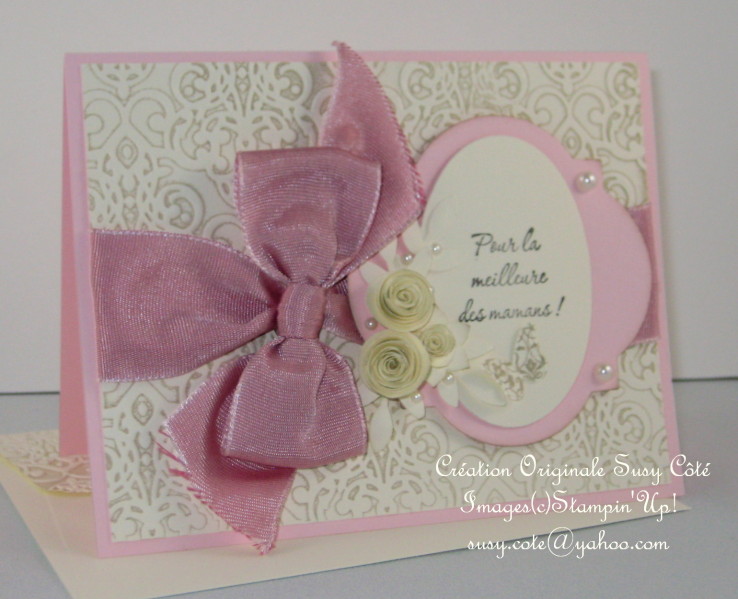
I've got a video (full-length and voiced!) over at StampNation today, about getting more out of your stamps by using them in fun and creative ways. I show how I made these two cards using stamps in ways probably not envisioned by their designers!

This video is exclusively for members of StampNation, "the place to learn and grow your stamping skills with like-minded stampers of all levels. Take online classes, share and swap your creations and take part in live stamping events to stimulate your crafting genius, all alongside other members of our big paper crafting family from around the globe".

If you're not a member, click here for more information.

I used:

Sunday 29 April 2018

Celebrate Friends: Multi-colour stamping


I showed this card the other day  when the latest Stamp of Approval collection was released and got a question about how I inked up the multi-coloured sentiment, so I made a two-minute video with some tips for using masking and a MISTI.


Saturday 28 April 2018

FS586 - Happy Birthday


Congratulations to this week's Splitcoaststampers' Featured Stamper, Donna (donnaks).

I chose this card as my inspiration:


I focused on Donna's:
-birthday theme
-layout (horizontal focal strip & sentiment on the lower right)

I changed:
-technique
-shaker
-fewer layers
-reversed the colours (my colours are in the focal strip)

I used an Alexandra Renke die to cut a window in my main panel. I created a shaker card with acetate, sequins and foam tape and laid the candel die cut into the window. I stamped the sentiment to the lower right. Because my card was mostly white, I used lots of colourful sequins as my shaker elements.

For some sparkle I added Star Dust stickles just along the bottom two edges of the card.

I used:


CC91, CTS269 - Celebrate


Good morning! I'm playing along with two challenges with this card that I made with an extra background I made for this card, ages ago. It worked so well for a frosty background, but I think it works for a pretty spring background, too!

I was inspired by the current The Card Concept Challenge:


And also the current CAS(E) This Sketch Challenge:


I started with my pretty, frosty background and stamped and embossed Mondo Hydrangea into some pink areas. Then, I watercoloured the flowers in a brighter pink for more contrast.

I die cut and stacked my sentiment so that it would be legible on the background. And for my card base, I used the new Oyster Gray cardstock from Ellen Hutson. It is a lovely soft colour, very smooth and perfect weight for a card base.

I used:


Friday 27 April 2018

Alexandra Renke Blog Hop


Good morning! I'm excited to be part of a hop to celebrate the arrival of Alexandra Renke products in the Ellen Hutson shop! (full blog list below)


These new stamps, dies and stenciles have a cool, edgy look and are so much fun to play with!

For my first card, I inlaid the 'You Are Amazing' die into a circle panel, with part of it overhanging for some added interest. I coloured one of the inserts with a rainbow of Copics (isn't it cool how it's part of the 'you' and part of the 'amazing'?) and then popped up the panel over a slightly larger circle that I had edged with the same markers. I offset the placement of the panel, to emphasize the overhanging portion of the sentiment.


I love the geometry of the Grid die! I chose to highlight the 'flowers' by inlaying a rainbow of the diamonds into the black outline. I used Best Wishes stamps and Wonderful die to create my sentiment.


I used:

Thursday 26 April 2018

AJVD/Muse263 - Happy Mother's Day


Good morning! I'm on the A Jillian Vance Design blog today with this Mother's Day card that I made for this week's Muse Challenge, where Ishani has given us a pretty green inspiration:


I focused on Ishani's:
-colours
-floral theme

Pop over to the AJVD blog for more info and shopping links!

Wednesday 25 April 2018

IB84 - Celebrate


I made this fun card for the current Inspired by All the Little Things challenge:


I focused on:
-layers of colour
-circles
-dripping chocolate icing

I started by creating my watercolour panel - I smooshed Distress Oxide inks (one at a time) onto my craft mat and then laid a portion of my panel into the ink. I dried it before doing the same with the next colour.

Once the panel was dry, I cut it with a square die and then used this Scattered Circles Strip Die (pictured above) from A Jillian Vance Design to create holes all over - I think it looks bubbly and fun!

I used the Grande Greetings Celebrate die (also from A Jillian Vance Design). I think the swoopy font mimics the chocolate dripping down the side of the cake.


I used:

Tuesday 24 April 2018

Celebrate Friends Stamp of Approval Now Available!

ETA APRIL 29 - Video at the bottom at the post.


The Celebrate Friends Stamp of Approval Collection is available now! I

f you want it, you need to be quick - these collections often sell out!

Here are two more cards using some of the fun new stamps - everything in this collection is so happy and fun! You're going to love it!


Stamps: WooHoo!
Inks: Black Jack, Tiki Torch, Fiesta Blue, Party Dress, Grass Skirt
Paper: Neenah, Smoke
Accessories: Matching dies (add-on to the Collection)


Stamps: WooHoo!, Punctuated Party
Inks: Midnight, Tutti Frutti, Tiki Torch, Lime Rickey, Something Borrowed, Flirty Fuschia
Paper: Neenah, Midnight
Accessories: MISTI (very important for stamping those rainbow letters!)

ETA: A quick video showing how I used the MISTI and masking for the rainbow letters:


Monday 23 April 2018

Celebrate Friends Stamp of Approval Blog Hop


Welcome to Day 3 of the Celebrate Friends Stamp of Approval Blog Hop! This Collection from Catherine Pooler Designs is full of products that you can use to make cards that celebrate friendship and lots of happy occasions throughout the year! And included in this collection is a NEW Mystery Ink.


There are actually 3 options this time - you can choose the Tea Collection, the Coffee Collection OR the combined collection! There are some add-ons as well that will coordinate perfectly with your new goodies!

You should have come from  Laurel's blog (full blog list below with details about how to win).
If you’re new to Stamp of Approval – click here to check out everything you need to know about this exclusive collection of stamps, dies and other goodies. All these products were designed specifically for this collection; they are brand new, and while they will be made available at Catherine's store in the future, they won't be available there for many months.
If you are a StampNation member, you get access to order starting on Monday, April 23rd at 10 pm. Not a StampNation member? Make sure you are on the wait list so you get access to the collection at 9 am Tuesday, April 24th before the public (at 6 pm). These collections always sell quickly (and often sell out!), so if you're liking what you're seeing on the blog hop, you'll want to ensure that you have an opportunity to get your hands on this collection!
Now, let's get on with my projects!

Stacking Cups:

SUPPLIES
Stamps: Cuppa Tea
Ink: Lime Rickey, Tiki Torch, Party Dress, Flirty Fuschia, Black Jack, Midnight
Paper: White

If one cup of tea can solve everything, imagine what 4 cups can do! I had some fun with colour and masking to create this stack of tea cups. I created the 'ground' for the cups by simply masking and blending some Black Jack ink above the mask.
Scattered Circles (X2)

SUPPLIES
Stamps: Punctuated Party
Ink: Tiki Torch, Orange Twist, Tutti Frutti, Midnight
Paper: White
Accessories: Celebrate Die, Scattered Circles Stencil

I discovered (maybe by accident!) that I could make two card fronts at once using the new Scattered Circles
stencil (it works well as a turnabout, too!)

Here's a quick video:


Be sure to hop along and comment for your chance to win one of 3 $97 Gift Certificates, which will be chosen randomly from commenters and announced on Catherine's blog tonight at 6 pm.


Sunday 22 April 2018

FS585 - Wish Big


Congratulations to this week's Splitcoaststampers' Featured Stamper, Suzy (aka SuzyS1104)


I chose this card as my inspiration:


I focused on Suzy's:
-horizontal strip of vertical stripes (does that even make sense?!)
-colours
-birthday theme

I changed:
-technique to create stripes rather than paper
-fewer layers
-no ribbon
-position of sentiment

I used the new MFT Envelope Buddy as a stencil and blended Catherine Pooler inks over  top to create my stripes. Before I removed the stencil I spritzed the inks with some water for texture and interest.

Here's a quick video:


I used:

Saturday 21 April 2018

MCV98 - Old School Delight


I dug deep into my 'stamping past' for my card for the current Muse: ChristmasVisions challenge, where Lindsey gave us this inspiration:


I focused on Lindsey's:
-blue and white colour scheme
-white image on blue background
-layout
-patterned background

These stamps are from the 'way back' - both wooden, the snowman from Stampin' Up (long retired) and the sentiment from Impress (still available here). I do still have a few wooden stamps, mostly Christmas-themed that I will never part with. I even had my Stamp-a-ma-jig out!

I also pulled out an old MFT Myriad Dots background stamp (also retired) that is just random dots and works perfectly as the reverse to the snowy sky behind the snowman.

I popped up my snowman panel and edged it with Stickles for some sparkle.

I used:


Friday 20 April 2018

EH Pinsights - Beautiful Drama Queen


Today, I'm playing along with the latest PinSights Challenge at The CLASSroom, where we're using this colour palette - Drama Queen.


I focused on the succulents - I just love how those colours seem to blend seamlessly together. To achieve this look, I layered up my colours, which is very easy to do with Distress Oxide inks.

I started by cutting a 4.25x5.5 panel of Ranger Watercolour cardstock. I smooshed various colours of Distress Oxide inks onto my Ranger non-stick craft mat and used the ink with lots of water to create a pretty washed background. I did two layers of this, drying in between layers so that the colours didn't get muddy.

Next, I embossed Mondo Hydrangea with Brutus Monroe Alabaster embossing powder. I smooshed more Picked Raspberry onto my 'palette' and added another layer of colour to each of the flowers. I love how the blues and greens underneath show through the pink.

I used the matching die to cut out the hydrangea and then cut the remainder of the panel with a pierced rectangle. I adhered the panel to a larger gray panel and then popped up the flowers. I coloured the flower centres with a yellow Zig Clean Colour marker and added touches of Stickles for some sparkle.

The sentiment is from the new Strong stamp set and is also embossed with Alabaster.

Here's a quick video:


I used:

Thursday 19 April 2018

Abstract Floral Thank You // Right at Home Stamps + Catherine Pooler Ink Blog Hop


Did you know that Nicole at Right at Home Stamps is now carrying Catherine Pooler Inks? What a fabulous pairing!

Today, the Catherine Pooler Designs Creative Team is celebrating with a blog hop, using CP inks and Right at Home stamps and dies! And  if you comment on each blog in the hop (list is below), you will be eligible to win your choice of one item from Right At Home's newest release!

I created this simple thank you card with Abstract Florals and matching dies, and Script Greetings.

I started by stamping my daisy centre with Party Dress. I used a stamping platform and inked it up a few times, with extra ink on the left side to create some dimension.  Then I used the large leaf stamp and Tiki Torch to create my petals, again using extra ink selectively. I love the shading you get with this simple technique! I added some dots with Orange Twist and then finished by stamping my sentiment in Midnight.

To create some extra dimension, I used the matching die to cut out random petals and popped them up on my card using foam tape.

I finished it off with 3 tiny gems for some sparkle.

Now, be sure to hop and comment at each blog stop for your chance to win a Right at Home prize pack! Winners will be announced on April 26 on the Right at Home blog.


AJVD - Sweet Rainbow Celebration


Good morning! I'm on the A Jillian Vance Design blog today showing how to use a flower die to make a scalloped circle focal point.

Wednesday 18 April 2018

Muse 262 - Best Version


This is my card for this week's Muse challenge, where Kim gave us a lovely spring inspiration:


I focused on Kim's:
-blue bird
-green leaves
-black sentiment

I used Perfect Vines dies to create a negative mask, and then blended Melon Ice and Lime Ricky for my background.

To create the multi-colour peacock, I used my MISTI and inked up a portion of my stamps with Aquatini, Something Borrowed and Flirty Fuschia. I added tiny gems to the tail for sparkle.

I used:


Sunday 15 April 2018

FS584 - You Are Strong


Congratulations to this week's Splitcoaststampers Featured Stamper, Susy (aka Tootsy). I chose this card as my inspiration:


I focused on Susy's:
-pink colours
-ribbon
-small flowers
-subtle background

I changed:
-die cut sentiment
-die cut ribbon
-stamped background

I started by cutting the ribbon from Courage out of my panel. I inked it directly with my Party Dress ink pad to get a deep rich pink colour.  Before I inlaid it back into the panel, I stamped the background using sentiments from Strong in a pale grey Altenew ink shade. 

I inlaid the ribbon back into the panel and stamped 'you are' to overlap the ribbon (because the ribbon is inlaid, the panel is flat and easy to stamp on both pieces). I die cut and glued the 'strong'.

I stamped one of the Courage flowers with It's a Girl and Party Dress, then cut it out with the matching die and popped it up for some dimension.

I used:

Saturday 14 April 2018

TO107 - Spring


Two more cards for the current Time Out Challenge, where the theme is Spring.


This is another card that I started at Tracey's house.  And here's the reason I didn't get it finished - too much laughing! Just kidding - spending time with Kim, Joyce and Tracey was a real treat!


While I was at Tracey's, I started by stamping the girl, masking her umbrella and then I added the boy. I stamped a few clouds and my sentiment. I coloured their faces and hair with Copic markers and then it was time for me to come home.

At home the next day, I sketched in the sidewalk with pencil and then masked the clouds so that I could have the sun peeking through. Then I finished the colouring, including the sidewalk with Copics.

When that was done, I masked everything and blended inks for the sky and ground.

And then I was exhausted and had another cute (but much easier) idea using the same stamps.


I used:

Friday 13 April 2018

Muse 261 - Hello


Here's my card for this week's Muse Challenge, where Tracey gave us this pretty spring inspiration:


I focused on Tracey's:
-floral arrangement
-hello theme
-use of die cuts
-lots of white space

I started by stamping the floral sprays from Grateful Heart at the top and bottom of a watercolour panel. I used Prima Confections to watercolour them.

Then I tried some partial die cutting, for interest. Instead of putting it on a regular A2 card, I used a square card base so that one of the cut edges is sticking up over the card base. It will still fit in a regular envelope.

No video today - I was lucky enough to be able to visit Tracey this week and she had some visitors from California - Kim Heggins and Joyce Mehrberg. I made this card while I was there, in between chatting, laughing and eating!

I used: