Today I've got 3 cards using the new Buffalo Plaid background stamp from Catherine Pooler Designs. There are so, so many things you can do with plaid.....
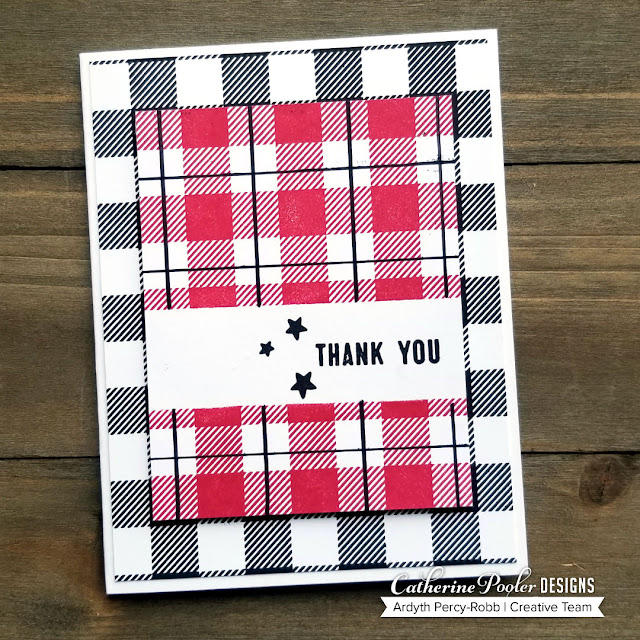
My first card is a simple thank you card. I started by using my MISTI and Midnight ink to stamp a full panel of the plaid on Catherine Pooler Premium White cardstock. I cleaned and dried the stamp.
I left the panel in my MISTI so that I could tell where to put a piece of 1 inch Post it Tape to create a masked area for my sentiment.
Then I stamped it on a new white panel with Rouge ink before removing the tape.
I trimmed the panel so that it would fit perfectly within the pattern on the black panel behind it.
I used a black lettering marker and a ruler to add the black 'in between' lines and finally stamped the sentiment and 3 stars. I popped the red panel up over the black one, so that there is a very narrow 'frame' around the red panel.
For the next card, I went a little more rustic. I simply stamped the plaid background with Sand Castle ink on a Sand Dunes card base, and then stamped one of the paw-prints from Wild About You in the open squares. You could of course vary this - right now I'm thinking black plaid on white with a star stamped in each square, using different colour of the rainbow for each row. For my image, I used the solid woodslice stamp from Hey Mister and my MISTI. I stamped it twice - once with the top half inked up with Stone Blue and once with the bottom half inked up with Sage. Then I stamped the sentiment, tree and howling wolf. The white panel was trimmed with one of the rectangles from Postage Stamp dies.
So, let's call this one "minimal" plaid. Believe it or not that 'frame' is created by a trimmed panel of black-on-white plaid underneath the front panel. I think it's kind of cool.
The front panel was created in my MISTI, where I lined up the moon stamp from Wild About You at the bottom of the panel, stamped it with Queen for a Day ink, turned the panel 180 degrees and stamped again. Then I repeated with Sage, Lemongrass and Rouge inks before stamping the sentiment from Hey Mister.
So there are 3 very simple ideas with this background stamp, and I still have many more! Let me know if you would like to see a video of these 3 (and more) in the comments below and I'll see what I can do.


What great use of the stamp Ardyth, and the one that I like the most is the final one - I had to look twice to see where the plaid was, but it didn't take long to see how you had used it!
ReplyDeleteBlessings
Maxine
Love all three of your cards! And yes, I always find videos so very helpful so if you decide to make them, I will certainly watch and learn! :)
ReplyDelete