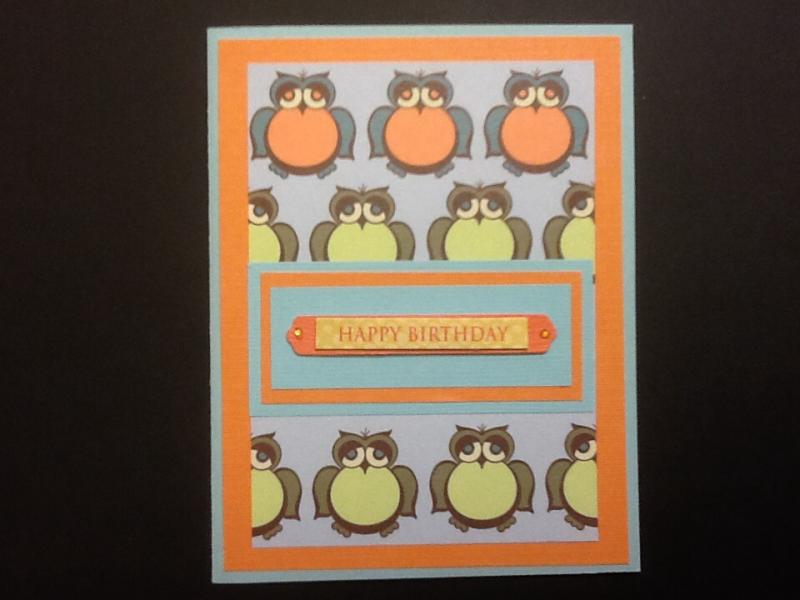
I focused on:
-bird theme
-rows of colourful images
I changed:
-layout
-one bird
-colour scheme
I just had to do a Froot Loop themed card with this toucan. I put the focus on my background, by stamping one of the flower centres from Be Wild and then colouring them all in with bright, happy Copic colours.
I trimmed the panel down with one of the Postage Stamp rectangle dies, and angled the edge with the die so it would have the stitching.
I stamped the sentiment directly onto the card base and popped up the un-coloured toucan in the corner.
Seems like I'm all about the alcohol inks lately, doesn't it? Playing with them is so much fun and it's only going to get better when my Pinata Brass ink gets here!!
I did not make a video for this one, but I followed the same process as yesterday's video, but I kept the colours closer to the centre of the panel, rather than all over.
I was really just playing with different colours, trying to get a feel for how much ink and how much blending solution is needed. I started with Pool and Limeade, then added Sunflower, Indigo and Purple Twilight to create a colour progression, and seeing how well they blend. The answer is 'not perfectly', but there are definitely some interesting results.
To finish the card, I trimmed the panel with a Pretty Pink Posh stitched rectangle and cut out a Concord & 9th Thanks. I backed the panel onto a black card base and added some Midnight Black Pretty Pink Posh jewels.
I started by stamping the large flower from Be Wild with Midnight ink all over the cardfront. I used a rainbow of Catherine Pooler inks to fill in the centres - first with a larger circle stamp and then again with a smaller one, to get the 'layered' look on my flower centres.
I used the Postage Stamp dies to create my sentiment strip and modified the sentiment a bit. I added a wonky zig zag on either end of the strip to add to the 'wildness'!
My one image is this beautiful Bold Butterfly from the recent Pretty Pink Posh release. I cut it out from my white card base and then inlaid it back into the negative space. I bent the wings and antennae up a little for some dimension.
To provide a place to glue the butterfly to, I lined the inside of my card with a piece of acetate. The inside back of the card has a piece of rainbow patterned paper on it, so that it peeks through the front of the card, and 'colours' my image.
I added some Pretty Pink Posh gems for sparkle and interest, and stamped a sentiment from the Peacocks.
Today is the blog hop for the March Release from Catherine Pooler Designs. I'm not on the hop (details below), but I couldn't wait to share another card with you!
This one is SO simple. I stamped the Wild Thing background in Midnight ink on a white panel, and then used one of the small flowers from Be Wild to stamp over some of the dots, making them into flower centres.
I used one of the Be Wild flower dies to create a scalloped circle for my sentiment from One in a Million Mom and used a flower centre to stamp the dots in matching colours. I popped it up over a black strip of cardstock and put it all on a black cardbase.
Good morning! I'm excited to be celebrating Pink & Main's 5th birthday by being part of a celebratory blog hop! See all the blog hop info with links and prize details below!
I made two 'bee-day' cards for the hop.
For the first card, I stamped and masked all 3 of these bees - I couldn't choose just one of these cuties! I kept my colour scheme simple because the scene was already quite busy, and I wanted some focus for the sentiment.
I used the Happy Birthday die but I trimmed the birthday, to make B day. And then I coloured the letters yellow with Copic markers, and then added a bee-like stripe. After they were glued down, I put Stickles on the letters and on the wings, for some sparkle.
For my second card, I coloured and die cut the hive and then die cut a bunch of the tiny bees. To keep this card more clean and simple, I blended a strip of blue sky but left the rest of the panel white.
BLOG HOP INFO:
There will be FIVE randomly-chosen winners of $50 store credit each.
The winners will be chosen from comments left on posts of the blogs linked below. To qualify, you must comment on all the blogs in the hop.
It's release day at Catherine Pooler designs! Tropical Treasures is now available and we're having an Instagram hop to celebrate!
I created a quick Instagram video showing how I did this foiling around the edge of my circle panel, so be sure to check it out.
For this card, I used a square panel and drew lines from the 4 corners to find the centre, using a pencil. Then I cut a circle with a die, trying to make sure the centre was in the centre, if you know what I mean!
Then, I used my foil press with a template created from vellum with a circle cut out. I drew lines on the vellum so that I could place each 1/8th of the circle in the same spot. I left the die in the same spot, turning the circle panel to put the foil in the same spot. I used silver sparkle foil from Gemini. It adds a very subtle shine around each flower.
I stamped the flower from Be Wild inside each foiled impression and then I used Copics to add more detail and dimension to the stamped images.
I blended It's a Boy around the edges before popping up the circle panel on a plain white cardbase.
Last week, I went to Virginia to visit my sister for a few days. I am so lucky that there are a number of my crafty friends who live nearby, and I was able to meet up with some of them.
Jessica and Cheryl came to my sister's house one evening for some conversation, snacks and a lesson in alcohol ink. Jessica was the teacher, Cheryl and I were very eager and willing students!
This was the second panel that I made that evening, with lots of coaching from Jessica!
I used some Ranger Alcohol ink as well as a Copic refill (B99) along with some Pinata Brass ink. I used an air puffer to move the ink, and a small paint brush to splatter some of the gold and some alcohol over everything.
And just before it was dry, I laid down some Gold Shimmer foil and it adhered in the 'sticky' places, adding even more shimmer!
I finished this card by inlaying a Catherine Pooler thanks die cut that had been heat embossed with Wow! Metallic Brass embossing powder. I think this swoopy font goes perfectly with the shapes formed in the alcohol inks.
I can't wait to practice and make some more of these panels!
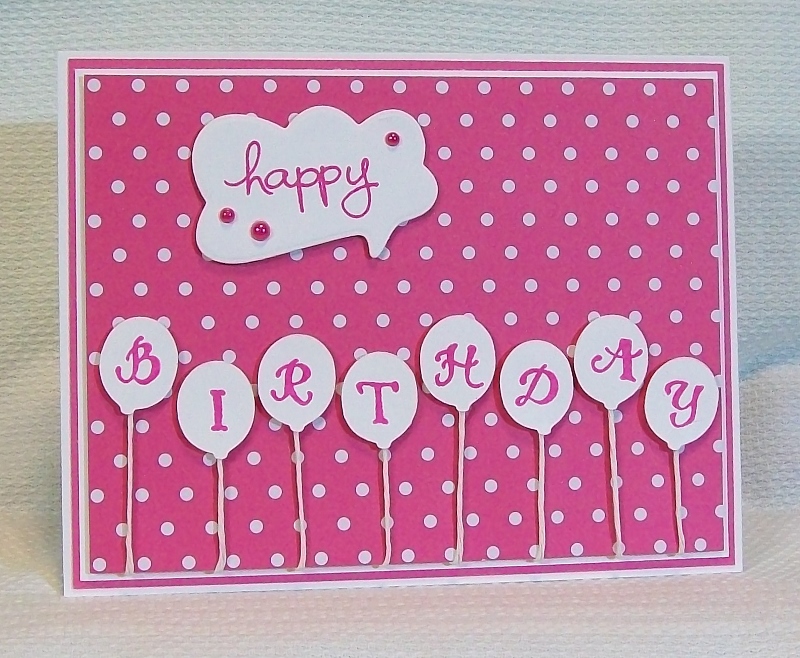
I focused on Liz's:
-celebrate/birthday theme
-multiple die cuts with one word/image
I changed:
-colours
-shapes of die cuts
-no stamping
I used the Winter Window die set to cut the rectangles and then used repositionable tape to hold them together while I stamped the blossom branch from Backyard Bird Friends twice with embossing ink. Then I embossed the images with gold.
Next, I used red Copic markers to colour the outside of each rectangle, going deeper in colour near the bottom edges.
I popped up the 5 panels on a black panel and then cut 'celebrate' from Letterboard Script 1 3 times - one white and 2 black. I embossed one with the same gold powder and then stacked them up.
I trimmed the black panel so that it was 4.25 x 4. Before I glued it onto a white cardbase, I used the lightest red marker to colour a strip at the top and bottom.
Good morning! I'm excited to be a part of a blog hop today for Heffy Doodle! This release is already available and we're hopping to give you some inspiration with these cuties!
My first card is very literal, I made the bees into a B, for 'Bee-day', but you could use any initial to personalize your card, since the sentiment and bees work together and probably give enough 'b' coverage! LOL!
I started by drawing a B lightly with a pencil. I stamped the bees, making sure that none of them was upside down, and then I created 3 masks so that I could stamp the leaves. Then I erased the pencil, so that it didn't become 'trapped' under my Copic colouring.
I stamped the larger branch on gray cardbase to add a bit of interest.
My sentiment was stamped with embossing ink, and then embossed with white embossing powder.
My second card uses the Circles of Life stencil as my focal image, rather than as a background element. I masked a panel with a rounded mask to create a landscape. Then I blended yellow and orange ink through the stencil.
I removed the stencil and used the other half of my landscape mask to allow me to blend the 'grass'. Then I stamped the sentiment, flowers and butterfly with black ink.
Then, I had a great idea, although it was a little late in the process. I placed the landscape mask and the stencil back over the panel and used some glimmer paste over top, to add to the sparkle and shine of my glorious Easter sunrise.
Here's a video:
Blog hop details!
Prize:The winner (chosen at random) who leaves a comment on each stop on the hop will receive a £50 voucher to the Heffy Doodle store. Winners will be announced on Monday, March 18, 2019 on the Heffy Doodle Blog.
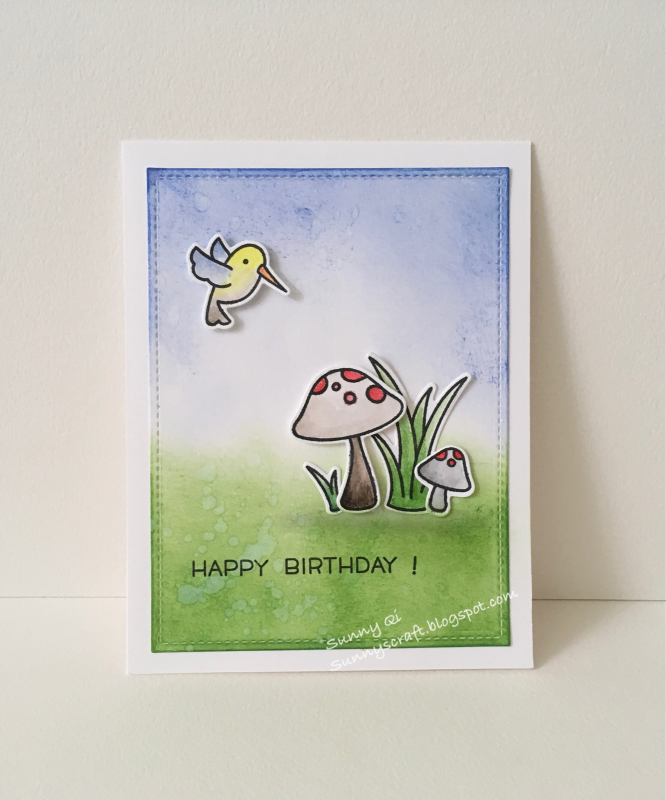
I focused on Sunny's:
-bird in flight in a blue sky
I changed:
-no ground or other images
-occasion
I started by masking a white card panel, using a straight piece of post-it tape along the bottom and an old retired arc shape from My Favorite Things. I blended various blue inks to create my sky.
I stamped, die cut and coloured one of the birds from the new Essentials by Ellen Backyard Bird Friends set and popped him up on the edge - as if he's soaring off into the future!
Welcome to Day 1 of the Pretty Pink Posh March Release blog hop (full list below)! This release is just full of spring and Easter goodies - perfect timing!
At this point this pretty card is a bit of wishful thinking, but hopefully Spring will arrive here in Toronto very soon!
I created this with the new Spring Wreath set, using the wreath in a different way, before filling the panel in with the other stamps from the set, to create an all-over pattern. Then I quickly coloured it with Copic markers.
I used Scallop Squares as a frame and one of the tags from Stitched Labels 1 for my sentiment strip, along with the new Friendship Mix sequins.
Here's a video with stamping and quick-colouring tips!
Here's the full blog list! There are 4 $25 gift certificates up for grabs (two winners each day). Winners will be picked randomly along the bloghop. Comments must be left by 11:59 PM PST on 3/13/2019. Winners will be announced on the PPP blog.
Today is my daughter's 16th birthday! I had a ton of fun making this foiled card using my new Gemini Foil Press.
You can get the Gemini Jr, Foil Press and the Confetti border foil stamp at Ellen Hutson (direct links below), but the number stamps are a little more tricky. They are going to be available tomorrow here in Canada on The Shopping Channel (my friend Jennifer is the Crafter's Companion presenter!!).
The numbers (and of course there is an alphabet as well) are really neat because they are actually partial numbers, and they come with a stamp that fits into the spaces.
I placed the 1 and 6 onto my foil press, making sure they were lined up straight. I used Aurora foil and then ran them through the Gemini Jr.
I stamped the flowers around the 1 and then quickly realized that my 6 was too close, and the corresponding flowers wouldn't fit. After I panicked, I realized that I could just mask the stamped 1 flowers and then stamp the 6 flowers. In the end, I think I like it better this way; I feel like it's a 16 rather than a 1 next to a 6, if you know what I mean.
I used pale gray ink to stamp the flowers so I could do some no-line Copic colouring. I added detail with my Faber Castell Polychromos coloured pencils.
For the background, I used the Confetti Border Foil Stamp and just ran my panel through the Foil Press a few times, moving the Foil Stamp, until the panel was covered.